Exploring Chickensoft #2: LogicBlocks
⚠️ This post assumes you have a basic understanding of Nodes and Scenes in Godot and at least mid-level familiarity with C# syntax if you plan to code along!
Introduction
In the last part, we downloaded Godot and setup a project from the Chickensoft GodotGame template. Not terribly riveting, but a good start nonetheless!
In this part, we’ll dive straight into implementing game logic that ends up being decoupled from the game engine.
To achieve this, we will start off by using LogicBlocks - a hierarchical state machine package for C# by Chickensoft.
🙋🏼 The cool thing about decoupling the game logic from the engine (and LogicBlocks being a general C# package - not a Godot package) means that it makes our game code vastly easier to port to other game engines.
The inner machinations of our game logic and state can live outside of Godot - instead Godot acts as the visual representation of our game.
Prepare for a long ride! 🍫
Scope
At the end of this post, we will have finished the following steps:
- Implement two major app states, InMainMenu and InGame.
- Reorganize our class files, moving closer to the Chickensoft project structure.
- Add a state to introduce intermediary fade transitions.
The goal is to introduce state machines to our project, aiming to build a solid game architecture that we can easily expand on using Chickensoft tools.
Implementation
I will start off by shouting from the rooftops that LogicBlocks is a really cool package!
🙋🏼 They’re all I dreamed of accomplishing with my FSM series. I could consider myself defeated - but frankly it’s more so being ✨ blessed ✨.
With LogicBlocks, we can create complex logic for our game nodes by separating it into different states. Part of the value proposition is that we won’t create a tangled mess while doing so.
🙋🏼 Of course, you can still end up with a mess, but it’ll be an idiomatic mess. That’s the most preferable kind of mess, if you ask me!
I remember promising simple beginnings, so we will be keeping it simple! This means that the LogicBlock usage might seem overkill, but I’ll try my best at explaining why we should bother at all.
Installing LogicBlocks
The packages need to be added to our project. The LogicBlock docs recommends including the introspection and diagram generator for added convenience and to get automatically generated diagrams for your state machines (we’ll take a look at that later).
To include the packages in the right spot in our project file, I’ll use good old-fashioned copypasting:
<!-- Production dependencies go here! -->
I’ll check my project sanity by hitting F5 in the editor - my game still runs.
Defining App states
Earlier, I created App.cs. Now, let’s put that on our App node and get coding!
using ;
using ;
public partial
Our naked App script looks like this. I’ll introduce the LogicBlocks boilerplate piece by piece and explain it as I go.
Let’s add the boilerplate and have a look.
;
using .;
using .;
using ;
public partial
public partial
}
A definition lightning round might be in order:
Logic: This is a reference to the LogicBlocks state machine. This is mainly used to send inputs into the machine.Binding: This is a reference to the state binding. It is primarily used to listen to outputs produced by the machine.[Meta]: This adds some convenience for our LogicBlock, such as automatically preallocating and setting the states that are used in the machine. As for details; it’s blinders on for this one! To quote the creators of Chickensoft:You don’t need to fully understand this package to make the most of it. In fact, you may never need to use it directly since you are more likely to encounter it as a dependency of one of the other Chickensoft tools.
[LogicBlock(typeof(AppLogic), Diagram = true)]: This attribute extends the class, enabling LogicBlocks generators to generate serialization utilities for the our machine. SettingDiagram = trueincludes the class in the diagram generation.AppLogic: The LogicBlocks machine that will contain our game logic in various states, taking in input and producing output based on rules we decide.Input: A class containing record structs that are used to send pieces of data as input into the machine.Output: A class containing record structs that are used to produce outputs from the machine, later to be consumed and reacted to in theAppnode via theBinding.State: An abstract state class for all our App LogicBlock states.InMainMenu: The state for when the app is in the main menu.InGame: The state for when the app is running the game.
🙋🏼 Later on in the blog series we will be using the AutoInject package. This grants us access to a separate set of lifecycle methods that we should prefer!
For now, I will be using the standard Node lifecycle - by overriding
Ready.
Sending and listening to inputs
Let us add some inputs; NewGameClick and QuitClick.
public static partial
We will be creating instances of these structs and send them into the machine, whenever we want to trigger logic (and typically produce outputs) in our machine.
Next, let’s actually send some input into the machine. We’ll connect the Button.Pressed signals to handlers in our script. At this point, I’ve added unique names to my buttons to get a hold of the references!
public partial
// ... Rest of script omitted!
At this point our App script actually sends input into the AppLogic machine! However, the input falls on deaf ears as we haven’t told our states to listen to any inputs yet.
Let’s fix that by adding and implementing the IGet<T> interface!
// Beginning of script omitted!
public abstract record State : StateLogic<State> {
public record InMainMenu
: State,
IGet<Input.NewGameClick>,
IGet<Input.QuitClick> {
public Transition ;
public Transition ;
}
public record InGame : State { }
public record ClosingApplication : State { }
}
The interface includes the Transition On<T>(in T input) method. We’ll implement them using the StateLogic.To<T>() function, returning a Transition. This will tell the machine what state to transition to when triggered by the input.
The code should now be hopping over to the other states; InGame and ClosingApplication. However, we’re not producing any outputs in the states.
Producing and reacting to outputs
The happenings we want to react to are: StartNewGame and QuitApp. Let’s add them to the output!
public static partial
We will be creating instances of these structs and output them from the machine. We will also bind logic to these outputs via our Binding in App.cs.
Also, we need to output the output. For game logic, we add the state constructor and specify what happens OnEnter. Tiny boilerplate incoming!
public record InGame : State
public record ClosingApplication : State
🙋🏼 There is also the
OnAttachandOnDetach. According to the docs these should be used for housekeeping stuff, such as subscribing and unsubscribing to events.
The final step now, is to actually react to the output from the machine via the Binding. We’ll hop over to our Ready function and set up those reactions!
public override void _Ready()
When running the game through the editor, we can now quit the game. This proves our state machine is working!
More transitions and states
However, we can also get stuck in the InGame state, since the New Game button transitions us there. We have no way of getting out of there!
This is in fact perfectly illustrated by the diagrams that the LogicBlocks.DiagramGenerator package generates for us:
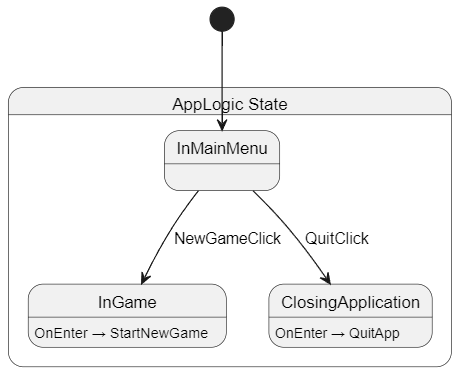
To showcase the ease-of-control that LogicBlocks gives us we’ll make a plan to:
- Add and remove
Game.tscnwhen we respectively enter and exit theInGamestate. - Allow for pressing Escape to return to the main menu from being in-game.
- Add a blackout transition between being in the main menu and being in-game (and vice versa).
Adding and removing the game
We have already added the StartNewGame output, but we’re only printing out a TODO message for now as a reaction to it.
Let’s replace that TODO print with a function call to a method we’ll call OnOutputStartNewGame. I’ll also refactor the QuitApp handler to an OnOutputQuitApp method and organize the output and input handlers into regions (see below).
public partial
We’ll add the _gameScene export variable and set it to Game.tscn in Godot.
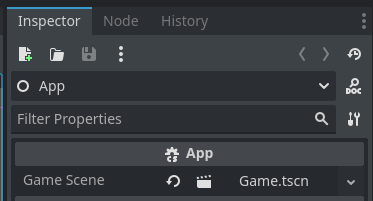
The OnOutputStartNewGame handler simply instantiates the game, adds it as a child and stores the reference to the node in our _game field.
private void
That should sort out adding the game whenever we get the StartNewGame output. If we run the game now, we realize the main menu is still shown. Let’s quickly add an output for showing and hiding the menu and call it UpdateMainMenuVisibility.
Let’s also hook the Binding up with a handler that actually calls the new OnOutputUpdateMainMenuVisibility handler, passing in the output boolean payload.
We want to show the main menu when we enter the InMainMenu state, and hide it when we exit it. You might already suspect what that will look like:
// part of our App class
public override void _Ready()
// NEW HANDLER, part of our App class, in the Output Handlers region.
private void ;
// part of our AppLogic class
public static
// NEW CONSTRUCTOR for our InMainMenu record state
public {
this.;
this.;
}
That works nicely - the main menu now hides when entering the game, and our test button shows!
We want to remove the game when exiting InGame. We’ll add an output, produce it in InGame.OnExit and hook up the handler to the binding.
// part of our App class
public override void _Ready()
// NEW output handler in App.cs
private void
// part of our AppLogic class
public static
// our InGame state constructor
public {
this.;
this.; // NEW PRODUCE OUTPUT
}
Returning to the main menu
Before we can actually return to the main menu, we need to make the InGame state listen to an input and transition us back to the InMainMenu state.
Now, we can opt in to using already existing inputs for this (like QuitApp) but I reckon it is better to make a separate one. I’ll call it Input.RequestQuitGame and have InGame implement IGet<Input.RequestQuitGame>.
In addition to this, I’ll override the Node._UnhandledInput method, and send the input whenever the user presses the default ui_cancel input by clicking Escape.
It looks like this:
// in our App Node
public override void _UnhandledInput(InputEvent @event)
// in our AppLogic class
public static
// in our AppLogic.State class
public record InGame : State, IGet<Input.RequestQuitGame> { // NEW INTERFACE
public {
this.;
this.;
}
public Transition ; // NEW IMPLEMENTED INTERFACE
}
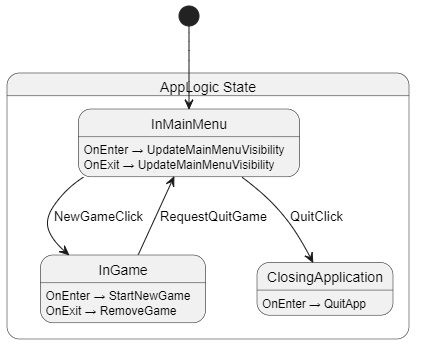
That does it - we can now swap between the InMainMenu and InGame states with ease! Looking at the generated diagram confirms the new transitions we made.
Intermission: Quick Refactor
The App.cs file currently holds all code relating to the app. It’s starting to get quite long and I’d rather split it up into more files.
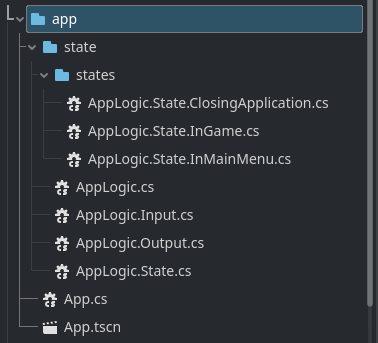
The recommended structure suggests you move the AppLogic, Inputs, Outputs and States into a state folder under the feature they belong to.
As this is the app feature, I break the nested classes out into their separate files and put them under the src/app/state or src/app/state/states folder.
Adding a fade transition
It would be nice if the transition wasn’t so sudden. I’d rather have it fade out to black, have the scene change, and then fade in from black.
To demonstrate the ease of LogicBlocks and how we can handle this in a very human-friendly way, let me go ahead and comment it as I go along.
I’ll be adding a FadingOut state, create some fitting inputs and outputs for the machine, make sure to send and listen to the inputs and also produce and handle the outputs. There’s a new concept being introduced also - you’ll probably catch it!
On the game logic side of things, we start by adding our new Input and Outputs.
// AppLogic.Input.cs
public static
// AppLogic.Output.cs
public static
We create and implement a new state called FadingOut. It keeps a reference to an enum representing the action that is to be taken when the fade-out has finished. It listens to Input.FadeOutFinished, to know when to trigger a transition.
public partial
}
}
I update our InGame state to output the FadeIn on enter. The transition on RequestQuitGame is also changed to transition to FadingOut.
In addition to that, I also use the Transition.With(System.Action<State>) method, letting me perform actions on the state before transitioning to it - here setting the FadeOutFinishedAction to BackToMenu.
🙋🏼 I’m not entirely sure about the FadeOutFinishedAction assignment here since I’m not a fan of type casting like this.
It works however, so I’ll let it slide for now. I suspect there are better ways to handle this.
// AppLogic.State.InGame.cs
public {
this.;
this.;
}
public Transition ;
I perform similar changes to the InMainMenu state, updating the OnEnter lambda and both transitions accordingly.
// AppLogic.State.InMainMenu
public {
this.;
this.;
public Transition ;
public Transition ;
}
On the Godot side of things, I add the following nodes:
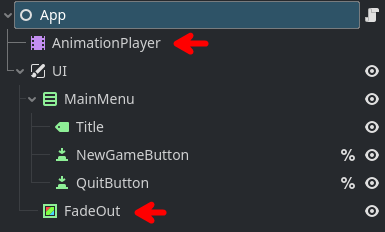
The FadeOut node covers the entire screen. I add two animations to the AnimationPlayer; “fade_out” and “fade_in”. They animate the FadeOut color from transparent to black and vice versa.
Finally, we connect the Godot visual layer, our App node to the new game logic. We add references to the animation player node, subscribe to an input handler and bind the new outputs to new handlers that perform start the fading animations.
;
using ;
using ;
public partial
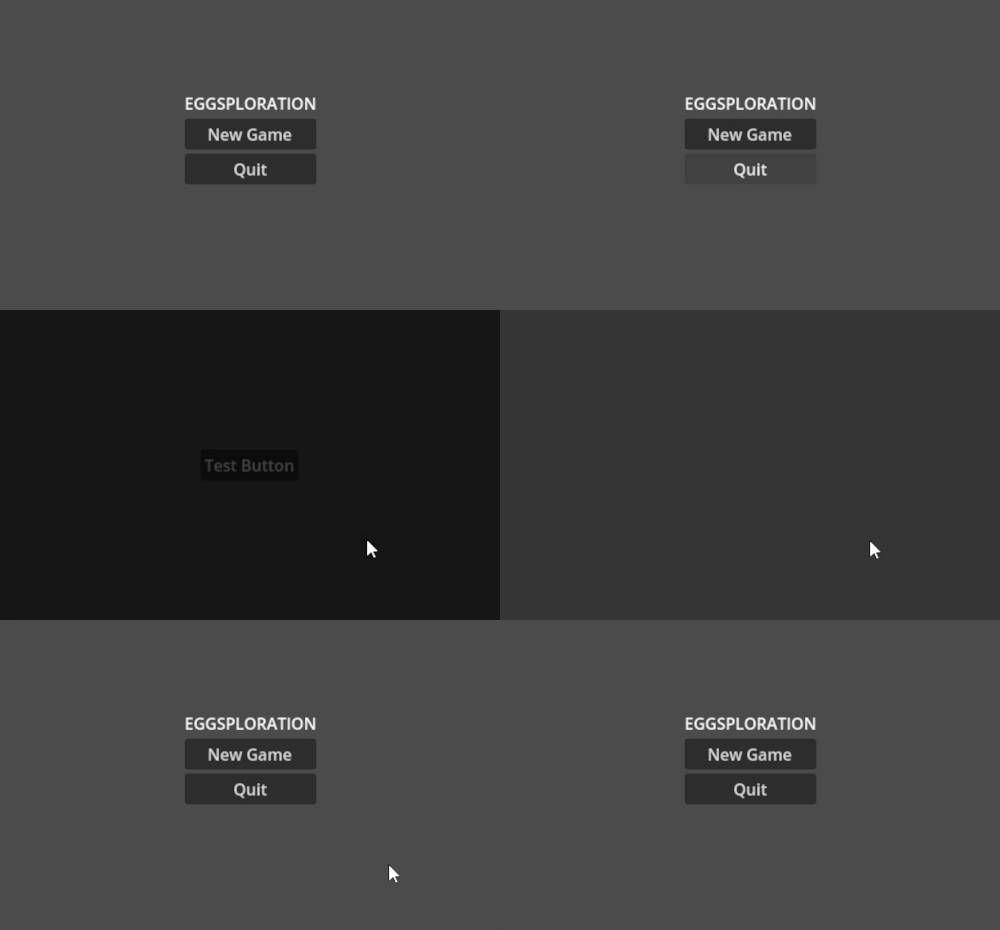
Et voilà! We have a nice fade effect as an intermediary state between main menu and game!
Wrapping up
We’ve finally arrived at the end.
The fruits of our labour might not be immediately evident, but take a look!
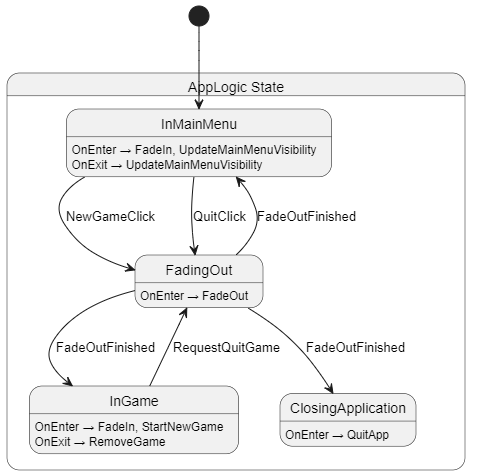
Seeing it all in front of you, I immediately realize that I’d prefer not using a generic fadeout state like this. I feel information gets lost because of the internals of the FadingOut state.
The Chickensoft GameDemo has separate LeavingMenu and LeavingGame states. I think I prefer that for clarity.
🙋🏼 Admittedly, it rarely pays off trying to be smart and generalize things like I did with the
FadingOutstate. You usually end up like a dummy getting your ass bit.I’ll sort that out before heading in to the next part of this series.
And speaking of the next part, we’ll introduce dependency injection with AutoInject and repositories to help facilitate communication between game features.
Remember, you’re a C# developer - you either love, hate to love, or love to hate dependency injection.
It’s gonna be awesome!
Thanks for reading,
Nilsiker
full source code available here